
Beginner Tripod Maintenance: Simple Routines
By Asha Menon • 24th Apr
Your tripod's stability at true height depends less on what's printed on the box than on how clean the joints stay. A tripod that works perfectly today can wobble tomorrow if grit builds up inside the locks and leg joints.[1] This article walks through the maintenance routines that keep your support gear reliable, field-ready, and sharp through years of use. For a deeper dive into long-term care, see our tripod maintenance guide.
Why Maintenance Equals Stability
Most photographers treat their tripod like a disposable item (toss it in the car, shoot, move on). Then they blame the tripod when images soften in wind. The culprit is often not the design; it's sand and salt inside the leg locks.
Clean legs lock firmly. Dirty legs slip. Slipping legs kill sharpness faster than any change to the frame.[1] The mechanics are straightforward: when grit dries inside a locking collar, it creates a paste-like barrier that prevents the lock from gripping the leg section. The result is micro-movement under load (vibration that translates directly to unsharp pixels, especially at focal lengths above 200mm or in wind). The fix is not new parts; it's removal of what doesn't belong.[1]
This is evidence-first: keep the locks clean first, and use lubricant only as a final touch.[1] The order matters.
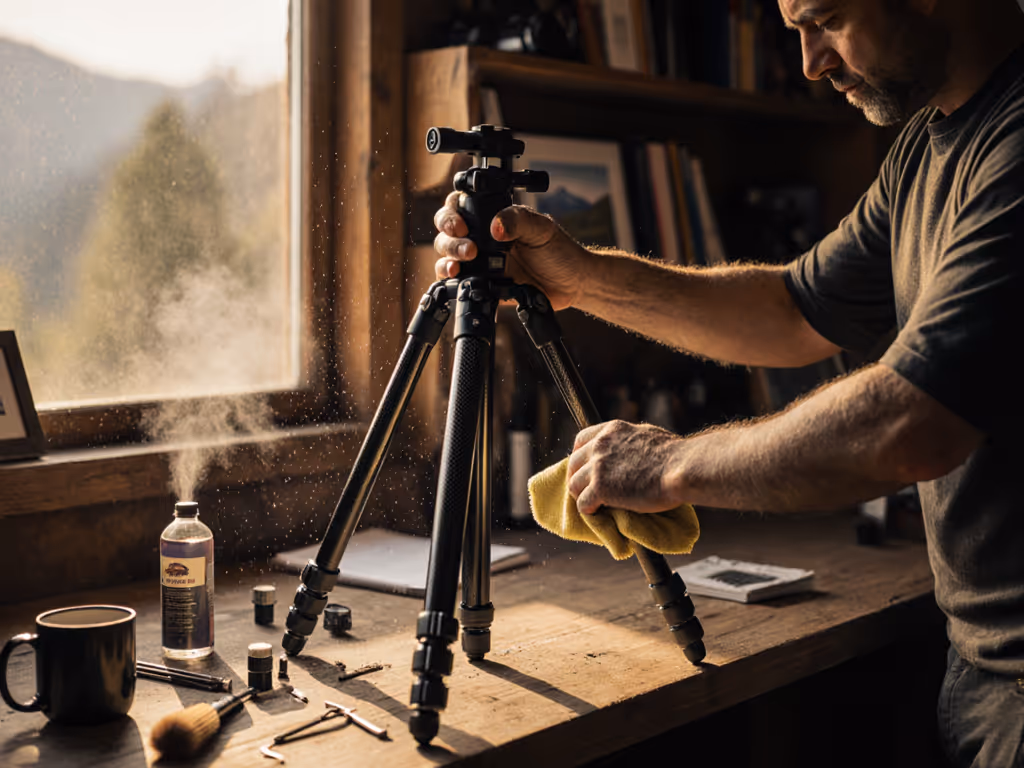
What You'll Need
Gather these supplies before you begin:[1][3][4][5] We tested cleaners and lubricants in our tripod care kit review to help you pick products that won't gum up locks.
- Soft toothbrush (old one, dedicated to gear)
- Lukewarm water and a bowl
- Cotton cloth or microfiber wipe
- Mild dish soap
- Silicone grease or dry PTFE spray (exact amount specified below)
- Compressed air (canned or handheld blower)
- Paper towels
- Small tray or bowl for tiny parts (shims, bolts, washers)
- Optional: Kitchen degreaser for heavy buildup[4]
You do not need heavy machine oil, automotive grease, or WD-40.[1] Those create the messy paste that wears joints faster.
Question 1: How Often Should I Clean My Tripod?
The answer depends on environment.[4]
If you shoot mud, snow, sand, or salt spray: after every session, at minimum a quick rinse and wipe-down with a damp cloth.[4] Do not let debris dry inside the locks.
For casual urban shooting on pavement: once monthly or before an important shoot.
For travel or landscape work in harsh terrain: deep clean every 2-4 weeks during active seasons.
Listen to your locks. If you hear a grinding crunch when twisting the leg collars, stop immediately and disassemble.[1] If you're unsure how your leg locks should feel, compare flip vs twist locks in harsh conditions to recognize normal resistance versus damage. That sound means grit is grinding the threading (damage in progress). A quick post-shoot maintenance session takes twenty minutes and prevents weeks of seized locks.[1]
Question 2: What's the Fastest Way to Clean After a Shoot?
Quick rinse routine (5-10 minutes):
- Wipe exterior with a damp cloth.[1]
- Twist each leg lock back and forth gently while holding the leg, this works trapped grit out without forcing it deeper.[2]
- Rinse under gentle running water if you've been in sand or salt.[3]
- Dry immediately with a soft cloth.[1] Do not leave wet.
- Check feet for sand clumps and pick them out by hand or with the brush.[5] For better grip on tricky ground, see budget tripod feet for sand, snow, and rocky terrain.
This post-shoot routine buys you weeks of smooth operation. Stability comes from prevention, not from chasing problems after they start.
Question 3: How Do I Take My Tripod Apart for Deep Cleaning?
Disassembly is straightforward if you plan it right.[4]
Step 1: Photo Reference
Take photos or a short video as you remove each part.[3][4] This saves reassembly confusion later, especially on your first attempt.
Step 2: Remove Legs
Unscrew the leg locks (locking collars) counter-clockwise until they come free.[3] Slide the leg sections apart carefully. Watch for shims (small curved plastic pieces that sit between sections to keep legs aligned).[1] They are easy to lose and often fall out when you least expect them.[1] Set them in a dedicated bowl and do not lose them.[1]
Step 3: Organize Parts
Lay all pieces on a paper towel in the order you removed them.[3] Keep bolts, washers, and screws grouped by location.
Step 4: Initial Rinse
Use canned air or a blower to remove loose dust and sand.[5] Then dip your toothbrush in soapy water and scrub threads, inside tubes, and around screw heads.[3][5] Pay special attention to the corners where tubes meet collars (sand hides there).[5]
Step 5: Dry Thoroughly
Lay all parts on a clean towel and air dry for at least 24 hours.[1] Do not rush. Use a microfiber cloth to wipe the inside of tubes after they feel dry to the touch.[1] Trapped water leads to rust, mold, and corrosion on steel springs and bolts.[1] Patience here prevents failures in the field.
Question 4: How Do I Lubricate Correctly?
The golden rule: less is more.[1]
You only need silicone grease or dry PTFE spray.[1][4] Apply a grain-of-rice-sized amount to the threads of each locking collar.[1] That is roughly 1-2 millimeters at most. Work the lock back and forth to spread the lubricant into the grooves, then take a clean rag and wipe off as much as you can.[1]
The goal is a microscopic layer that stays inside the threads, invisible to the eye.[1] If you see a glob of grease when finished, you used too much. Remove it.
For leg angle adjustment locks and spring mechanisms, apply the same grain-of-rice dose and work it in smoothly.[4] Do not over-saturate. Excess lubricant collects grit, defeating the purpose.
Question 5: How Do I Reassemble After Cleaning?
Reassembly is disassembly in reverse order.[4]
- Start with the largest sections of each leg (the tube closest to the head).
- Reinstall shims first, before sliding the next section on.[1] This keeps legs aligned.
- Twist the leg sections together by hand gently. Do not force.
- Apply lubricant to the locking collar threads (grain of rice only).
- Screw the collar on hand-tight, then twist to spread the grease. Wipe excess off.
- Repeat for each leg and joint.
- Test each lock by hand before use. Collars should turn smoothly without grinding or sticking.
Do not reattach to your tripod head until everything moves smoothly and no parts rattle. Give each lock one last twist to confirm consistency.
Question 6: What If My Tripod Feels Stiffer or Grittier After Cleaning?
This usually signals one of four issues:
Water is still trapped inside. Stop. Let it air dry longer. Open the leg sections again if needed.[1]
You applied too much lubricant. Excess collects dust.[1] Disassemble that joint, wipe it clean again, and reapply with a much smaller amount.
A shim is misaligned or missing. Check that all shims are seated correctly. If you're missing one, the leg will feel loose or wobbly. Order a replacement from the manufacturer.
The locking collar was already damaged by grit before cleaning. If grinding sound and resistance continue even after thorough cleaning and minimal re-lubrication, professional service may be necessary.[2]
Question 7: Should I Do This Maintenance Myself?
Yes, for basic cleaning and simple lubrication. The process is straightforward, and the result is total control over what enters your gear.[4]
Consider professional service if:
You are uncomfortable disassembling for the first time and have access to a repair shop. Your tripod has been exposed to saltwater and you want corrosion assessment. Your tripod is missing parts (shims, bolts, seals) and needs a full rebuild.[4]
A professional can replace consumable wear items and detect stress fractures invisible to the eye. For routine maintenance, you have everything needed.
The Field Evidence
One morning on a sea cliff in pre-dawn gusts, I timed how long my tripod took to stop oscillating after a bump using a smartphone timer and a laser pointer aimed at a distant rock. The carbon legs with freshly cleaned locks damped in seconds fewer than a heavier aluminum set with seized joints from neglect. That small difference (a few seconds of decay time) meant the keeper rate at 200mm focal length was markedly higher. It was not the materials; it was the maintenance.
Measure what matters: decay time, not fantasy load ratings. Keep your locks clean and lightly lubricated, and your tripod will deliver the stability your images require.
Where to Go Next
If your tripod is older or heavily used and you suspect wear beyond simple cleaning, consult your manufacturer's service options or a local camera repair shop.[4] Before you book a repair, check our tripod repair cost comparison for typical pricing and turnaround times. They can assess whether shims, seals, or bearings need replacement (a full rebuild that restores your tripod to working condition).
For regular maintenance, start with a post-shoot wipe after your next session. Listen to the locks. If they turn smoothly and silently, you're on track. If you hear a crunch, schedule a deep clean. Consistency wins.
Related Articles